
The Price is Right: Corrective Color
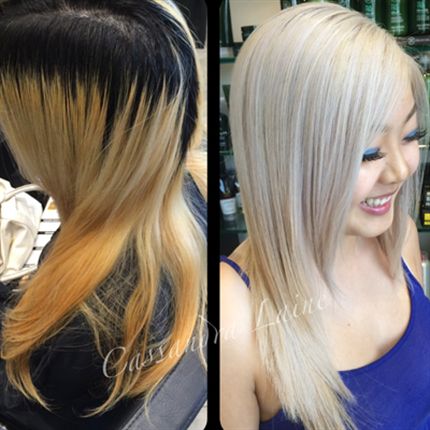
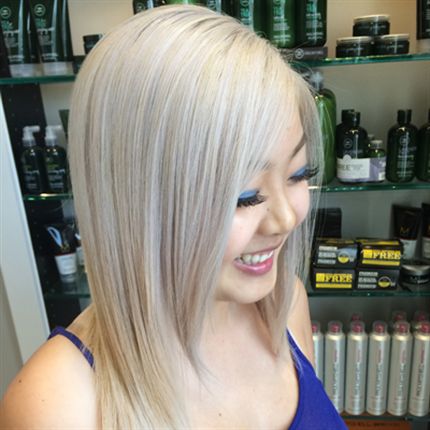
Pricing corrective color can be tricky, but getting it right? TOTALLY NECESSARY. So BTC went to #ONESHOT Winner Cassandra McGlaughlin (@cassandraplatinum) and broke down her winning look for transformation shot of the year. Everything from the consultation, the booking, the process and the price—we got it all. Because when you’re spending hours on one client, nothing is more important than getting the process and the price just right!
Consultation
“We start the consultation process when they call to make an appointment. We ask questions over the phone—what is currently on their hair or are they looking for a big change—to gauge if it is a regular color service or if it will be a longer transformation. If possible, we ask them to send pictures of their hair. We also offer a complimentary, in-person consultation during which we give them a price quote, figure out how many hours we will need and determine if we can even do what they are asking.”

Booking
“A lot of pressure is alleviated with an email or in-person consultation, but sometimes it’s just kind of going on the fly. I always work with one or two assistants, and that makes my life so much easier. I don’t know if it would be possible to do it by yourself unless you’re only booking 1 or 2 clients a day.”
Process
“My first step was to lift the Level 2 to a Level 8. I used Paul Mitchell Dual-Purpose Lightener + 30-volume developer. I was careful to avoid overlapping the lightener on any previously lightened hair. I used baby foils (foils torn in half or quarters) to incubate the regrowth and cold shaft with an overlay technique, leaving the ends outside the foils. My sections were extremely small to ensure even lift and saturation. I processed this hair to yellow/orange. Once the regrowth was lifted to a similar level as the ends, I began my second application. I applied lightener mixed with 20-volume developer in foil packets to darker panels and processed everything to the yellow stage. I knew that the hair needed a boost to get to the pale yellow stage of lift. So I removed the foils and once everything reached a relatively even yellow, I applied the lightener + 30-volume developer over the mixture that was already processing on the cold shaft, careful to avoid coming too close to the scalp. From the edge of the regrowth, through to the ends, I applied a mixture of Paul Mitchell Dual-Purpose Lightener + 20-volume developer + Paul Mitchell Shampoo One. I processed for 10 to 15 minutes until all strands lifted to pale yellow. After shampooing, I combined equal parts Paul Mitchell Ultra Toner Ash + 9P + 10-volume developer, applied it to all strands and processed the hair for five to 10 minutes. I finished with Paul Mitchell PM Shines equal parts 9V + 9A + Clear, followed by an Awapuhi Keratriplex Treatment to repair the hair and seal the cuticle.”
Price
“I charge per service. My rule of thumb is that I have to generate what I would normally generate on any day—you can’t lose money doing extreme colors. It’s super important not to compromise your price or your steps. I won’t do a color correction unless I can tone, condition or lighten as many times as necessary. A ballpark is $100 an hour, but I still price per service, so if I have to do a color remover, a lightener and a deep conditioner, I charge for each service individually.”


