
How-To: Platinum Balayage Perfection
A gorgeous platinum balayage? The perfect way to say BYE GIRL, BYE to those ashier winter hues. Here's how you can give her a summer transformation she's LOVE.
How-To: Platinum Balayage Transformation
A gorgeous platinum balayage? The perfect way to say BYE GIRL, BYE to those ashier winter hues. But an amazing transformation isn’t always easy—after all, most good things take some time, right?
When Kristin Grip (@ColorbyKristin), owner of @TeaseSalonOC in Costa Mesa, Calif., had a client walk in asking to go perfect platinum from her light brunette, Kristin knew it’d take some patience:
“After consulting with the client and looking at her target pictures, I decided to split her appointment into two sessions that we did one week apart,” explains Kristin. “I think many stylists would have begun with foiling her with bleach, but I was worried that it may lift unevenly or that she would get breakage from unintentional overlapping. The best route for me was to first even out the roots and mids to match her end color so I could apply bleach in a separate step with more predictable results.”
See how she did it!
Want to be featured? Check out BTC’s Instagram
and tag your pics to #behindthechair!
Appointment 1
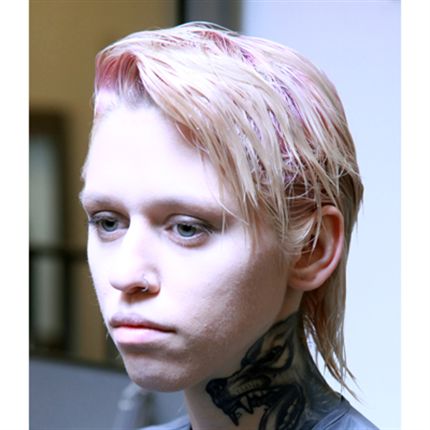
Before
Color Formulas
Formula A: Redken Extra Lift EL-B + 40-volume developer + Olaplex (1:2:1)
Formula B: 2 oz. Redken Shades EQ Equalizing Conditioning Color Gloss
09T + 1/4 oz. 09B
Application
1. Apply Formula A with foils in back-to-back panels about 1/4-inch thick. Use a foil board under the foil for precise application, and apply only to the dark hair, staying 1/2-inch off the scalp and feathering the line.
Pro Tip: For those blonde ends, Kristin made sure they were folded out of the foil to avoid extra lightening.
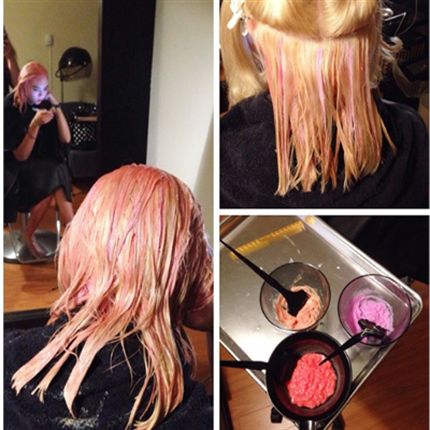
Kristin’s back-to-back foils work their magic.
2. Process and rinse. Then use Formula A once more to bump her base at the shampoo bowl.
3. Let the root process until it’s about one level darker than the mids to add depth and dimension.
4. Tone the root with Formula B for about 5 minutes.
Pro Tip: Add Shades EQ clear to your toner and then flash-tone the mids and ends for some extra pop!
Appointment 2

After the first appointment.
Color Formulas
Formula A: Redken Blonde Icing Ammonia-Free Conditioning Cream Lightener + 30-volume developer + Olaplex
Formula B: Redken Blonde Icing Ammonia-Free Conditioning Cream Lightener + 20-volume developer + Olaplex
Formula C: Redken Shades EQ Equalizing Conditioning Color Gloss 09T + 09V, 1:1
Application
1. To leave some depth near the root but still get a pretty platinum, do a full-weave using Formulas A and B with the assistance of a foil board for precision. Place Formula A on the darker areas in Zones 1 and 2, and Formula B on any beige areas in Zones 2 and 3. Leave out any ends that are already fairly white.
2. After completing about three foils, gather the hair left out in between the foils and balayage the mids and ends with Formula A and wrap it in a foil.
3. After processing and rinsing, tone the root with Formula C for about 4 to 5 minutes.
Pro Tip: Add Shades EQ clear to your toner and then flash-tone the mids and ends for some extra pop!

