
How-To: Masculine Cut For Fine and Thinning Men

You know the situation—your gentleman client sits in your chair and you notice his hair is getting a little…thin on top. Here’s how you can wow him and give him the appearance of fuller, thicker hair with a masculine, modern shape!
This how-to comes from ReGenesis® by RevitaLash® Cosmetics Global Creative Director Tracey Hughes, four-time Australian Hairdressing Awards Educator of the Year winner. “The masculine, square, flatter shape complements the shape of his face while retaining length through the top,” Tracey says.
To help your guys maintain that fuller hair confidence outside of your chair, set them up with the ReGenesis® for Fine & Thinning Hair Collection. The products address breakage and brittleness while targeting low hair density to promote the look of thicker, fuller-looking hair and a healthy scalp.
Win a ReGenesis® Detox Hair & Scalp Masque! Enter Now!
Hair Prep How-To
Get his hair ready by first washing with ReGenesis® Thickening Shampoo. Next, apply the ReGenesis® Detox Hair & Scalp Masque to rejuvenate, nourish and detox his hair and scalp and give him a little pampering. Finish your prep by applying the ReGenesis® Hair Volume Enhancer Fast-Absorbing Foam, using this time to explain how the foam contains the propriety BioPeptin Complex designed to enhance volume and pointing out how fast the foam applies and dries.
Cut How-To
1. Create a square section from the temple area on both sides through to the top of the crown.
2. Begin the haircut on the sides by working with a flat layering technique. Take small, fine, vertical sections at 90 degrees. Maintain a 90-degree finger angle—it should run parallel to your sectioning.
3. Continue working with vertical layering through the sides to the center back of the head. Maintain your 90-degree elevation and 90-degree finger angle at all times, keeping small, fine sections so you can see your guideline clearly.
4. Once you complete the first side, begin on the other side. After you’ve cut your first couple of sections, check your balance with the opposite side. Continue through to the center back area to meet the previously cut side, cross-checking horizontally.
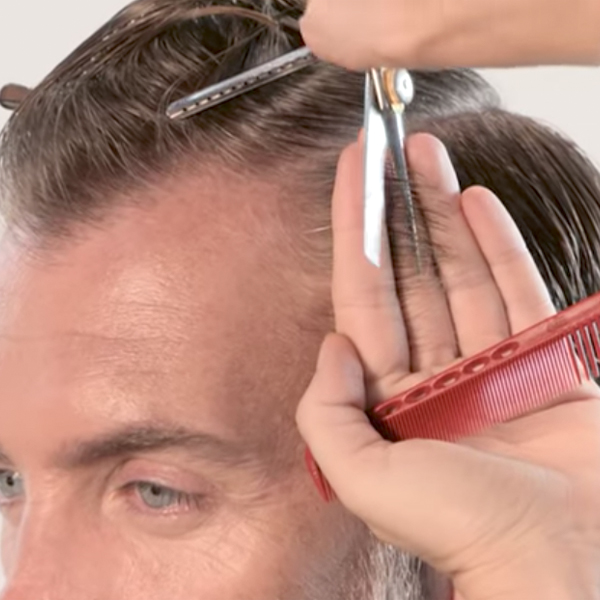
5. Use a scissor-over-comb technique around the haircut. Lift the comb out as it curves up the head shape, allowing you to blend into your previously cut flat layer. Working on dry hair this way will allow you to comb the hair back down to its natural fall and give maximum control. It’s important to maintain the rate of movement between your scissors and your comb at the same time.
6. You can also do reverse scissor-over-comb in the corner of one side that you find more challenging to reach.
7. Clean up the hairline with a clipper-over-comb technique using the smaller end of your comb. This allows you to maintain a natural result in the finished hairline.
8. Now continue with horizontal sections through the top area, projecting the hair to a 45-degree angle below the horizontal line and connecting these horizontal sections to the previously cut vertical flat layer.
9. Continue working with the horizontal sections through to the top of the center of the head. Remember to work in small, fine sections for precision. Keep your fingers parallel to your horizontal sections.
10. Repeat the technique on the other side, then dry the hair to check the haircut. Use your fingers to mold a slight quiff through the front area.
Watch the how-to below!
More from
Tracey Hughes
-
Best of 2017
2017 Is The Year Of The Bob—Here Are 5 How-Tos!
-
Best of 2017
2017 Blessed Us With These 10 Cutting How-Tos
-
Balayage
4 Color Formulas, 1 Celebrity Braid and Loads of Inspiration From Joico
-
Bobs
Fuller-Looking Bob
-
Business
Communicate Like a Pro in These 4 Common Salon Situations
-
New Appointments
ReGenesis® by RevitaLash® Cosmetics Appoints New Global Creative Director
-
News
BREAKING NEWS: 16th Annual Stylist Choice Award WINNERS ANNOUNCED

