
How-To: Honey Blonde Balayage and Frozen Hand-Painted Blonde
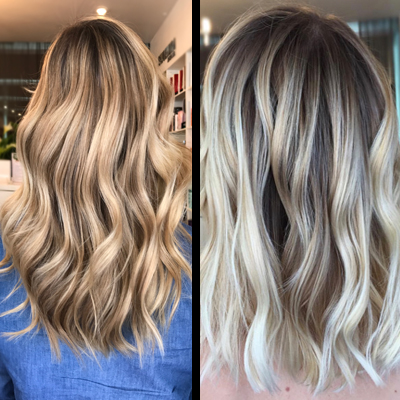

It’s true—two blonde color formulas are better than one. Especially when one of them is a warm honey bronde and the other is a frozen blonde that’s hand-painted to perfection. Created by Australian-based colorist Michael Kelly (@michaelkellycolourist), here are the color formulas and how-tos for these stunnas!
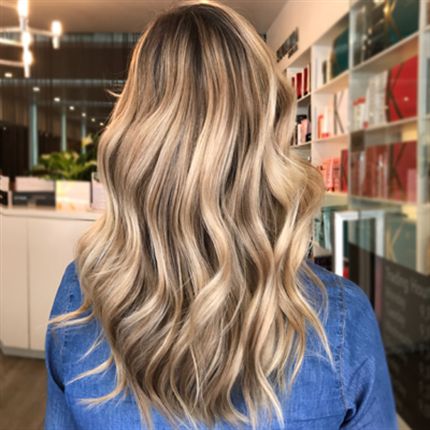
How-To: Honey Blonde Balayage
Redken Color Formulas
Formula A: 3/4 Pearl + 1/4 Titanium + 40-volume Pro-Oxide Cream Developer
Formula B: Flash Lift + 10-volume Pro-Oxide Cream Developer
Formula C: Shades EQ Cream 07NGR + 07WN + 000 Crystal Clear
Formula D: Flash Lift + 30-volume Pro-Oxide Cream Developer
Formula E: Shades EQ Gloss 07NW
Formula F: Shades EQ Gloss 09NW
Formula G: Shades EQ Gloss 09NW + 000 Crystal Clear
Application
1. Starting at the hairline in the nape, apply Formula A. Work diagonally through the interior and above the ear on the left and right side by adding a mock-balayage highlight of Formula B and a babylight of Formula A.
Pro Tip: Spacing the highlights out and allowing the natural hair to still be visible will give depth and dimension to the overall color.
2. As you work toward the crown, apply Formula C throughout Zones 1 and 2, fading out at Zone 3 to create lighter tips.
Pro Tip: Apply babylights around the crown area to keep the depth.
3. Apply Formula B around the hairline to frame the face and add a pop of color. Let process for 30 to 45 minutes for each zone. The lightest pieces should be pale yellow.
4. Then, go through and apply Formula D around the hairline and through the midlengths using a basin-balayage technique. Process for 15 minutes. The hair is already light and this will ensure color is bright without being over-processed or damaged.
5. Create a root shadow using Formula E. Leave out the hairline and process for 15 minutes. Then rinse and towel-dry the hair.
6. Tone with Formula F at the hairline and throughout Zone 1. Then tone with Formula G in Zone 2 for 10 minutes. Finish by adding Formula G to the ends and the rest of the hair for 5 minutes.
7. Use pH-Bonder Pro Treatment for the final look.
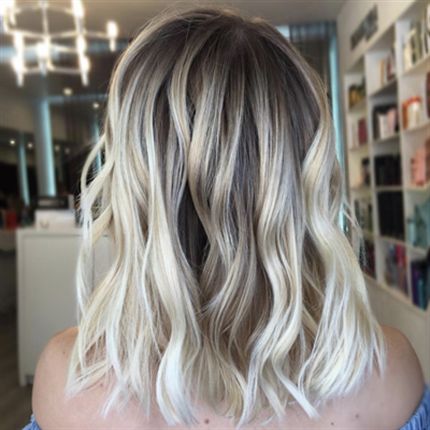
How-To: Frozen Hand-Painted Blonde
Redken Color Formulas
Formula A: Flash Lift + 40-volume Pro-Oxide Cream Developer + pH-Bonder
Formula B: Shades EQ Gloss 06N
Formula C: Shades EQ Equalizing Conditioning Color Gloss 09NB
Formula D: Shades EQ 000 Crystal Clear
Application
1. Starting in the nape, take horizontal, zigzag sections and paint Formula A with the Parisian balayage technique. Use the high point of the triangle in your zigzag section as a guide to place your lightener.
2. Taking large sections, tip out the ends heavily and saturate with a healthy amount of Formula A for maximum lift. Between each section, place cling wrap to help process and ensure that you’re lifting to the lightest level.
3. Continue moving up the head toward the hairline and painting in your zigzag sections. Leave the hairline out around the face and continue to layer the cling wrap on top of each section.
Pro Tip: Working in this sectioning pattern allows for different levels of graduation.
4. Once painting is complete (with the hairline still left untouched), let process for 45 minutes at room temperature.
5. After 45 minutes, paint Formula A along the hairline. Paint back off the face in large sections with heavy saturation to create a bright pop of blonde. Cover the remaining hair with cling wrap and process for 15 minutes, lifting to pale yellow.
6. Rinse, cleanse and apply pH-Bonder Stage 2 Post Service Perfector Treatment for 10 minutes. Then cleanse and prepare for zone toning and glossing.
7. Leaving the bright hairline, paint Formula B onto Zone 1 and process for 5 minutes.
8. After 5 minutes, apply Formula C to Zone 2 and only at the hairline in Zone 1.
9. Lastly, apply Formula D to all ends to create an untouched and bleached look.
Loving these shades? Get the details
on the product behind the color!
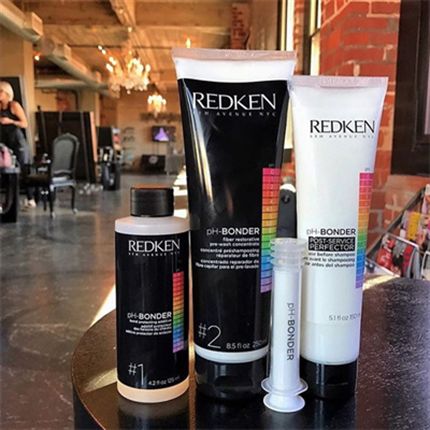
When we saw these two gorge colors Michael posted on his Instagram account, we felt we had to share his amazing work with our members. Hello—wintry blondes are hotter than ever right now! So, what’s his secret? Along with an impressive background and long career as a stylist behind the chair, he attributes some of his creations to Redken’s new pH-Bonder.
“I’m a big lover of Redken, from the color and the lighteners to the education and chemistry/science behind it all. So, when I found out that Redken was releasing its own version of a bond perfecting and enhancing product, it was a no brainier for me to organically want to try it out,” Michael told us. “It’s simple to use, there are no issues with lift or adjusting developers, there is no wasted time by adding it to your colors and the Stage 2 Treatment only needs to stay on for 10 minutes! To say I’m obsessed would be an understatement!”
More from
Redken
-
Celebrity
11 Questions With Celebrity Colorist Tracey Cunningham
-
Blonde
Lived-In Blonde With Warm Vivid Pops
-
Glossing/ Toning
How To Achieve “Glass Hair”: Smart Hacks From Hairdressers
-
Monthly Product Launch List
The Best Hair Launches Of March 2024
-
Blonde
The Biggest Hair Color Trends of 2024
-
Brunette
Caramel Chocolate Brunette With Gray Coverage
-
Awards Shows
The Best Celebrity Hair Colors & Formulas From The 2024 Golden Globes
-
Blonde
Guide To Gray: 5 Tips To Blend or Cover Stubborn Grays
-
News
How Maui Hairdressers Are Rebuilding Post-Lahaina Fires
-
Blonde
Blonde Ribboned Root Smudge
-
Balayage
Warm Glow Lived-In Blonde Balayage
-
BTC Hair Trend Report
Quiet Luxury Blonde: The “Old Money” Trend Explained
-
Blonde
Dear Colorists, Do You Enforce A Healthy Hair Policy?
-
BTC Hair Trend Report
Your Guide To Fall & Winter 2023’s Hair Color Trends
-
Blonde
Muted Honey Blonde
-
Industry News
Redken’s Safe Space Course Creates A More Inclusive Salon Experience
-
Haircare
ACIDIC BONDING CONCENTRATE 5-MINUTE LIQUID MASK
-
BTC Events
AI, Mental Health & Social Media: 7 Business Tips You Can’t Live Without
-
Copper
What Is The “Cowboy Copper” Hair Trend? Here’s What It Really Means…
-
Celebrity
Margot Robbie’s ’60s-Inspired Ponytail at the “Barbie” Premiere
-
Additive
4 Tricky Hair Color Scenarios & What You Should Do!
-
Gray Coverage
These 8 Steps Will Soften & Cover Grays In Just A Few Minutes
-
Hair Color
WWYD: How To Stop Your 6N From Turning Orange
-
Glossing/ Toning
Coral Crush

