
TIGI Colour “Classic” Step-by-Step

TIGI Colour “Classic” Step-by-Step
HOW-TO STEPS 
-
 1
1Colour Selection 1
Roots to ends: TIGI Colour Creative with TIGI Colour Activator 20 volume/6%Colour Selection 2
At the roots: TIGI Colour Creative with TIGI Colour Activator 20 volume/6%
Mid-lengths and ends: TIGI Colour Creative plus 3 inches of TIGI Colour Mix Master and with TIGI Colour Activator 20 volume/6%Colour Selection 3
At the roots: TIGI Colour Creative with TIGI Colour Activator 20 volume/6%
Mid-lengths and ends: TIGI Colour Ultra Lift plus 2 inches of TIGI Colour Mix Master with TIGI Colour Activator 30 volume/9% -
2
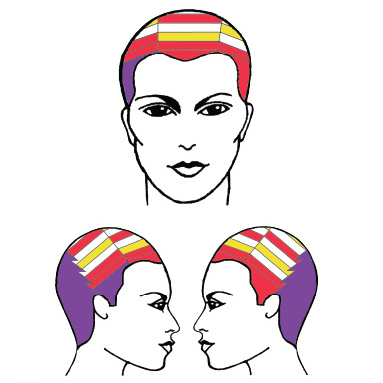
Step 1. Take a zig-zag parting from the crown to the top of the ear on both sides and isolate with TIGI® Colour™ Meche Strips.
Step 2. Undercolour the back section with Colour Selection 1 and isolate with TIGI® Colour™ Meche Strips.
Step 3. Start on the side of the natural part and take a 1-inch diagonal back parting off the front hairline and apply Colour Selection 1. Isolate with TIGI® Colour™ Meche Strips.
Step 4. For the next two slices, apply Colour Selection 2 and isolate with TIGI® Colour™ Meche Strips.
Step 5. For the remaining slices, apply colour selections in the following pattern: Leave Natural, Colour Selection 3, Leave Natural, Colour Selection 2. Isolate with TIGI® Colour™ Meche Strips.
Step 6. For the opposite side, subdivide at the recession area for better control.
Step 7. For the side area, apply Colour Selection 2 to the first two slices and isolate with TIGI® Colour™ Meche Strips.
Step 8. For the remaining slices, apply colour selections in the following pattern: Leave Natural, Colour Selection 3, Leave Natural, Colour Selection 2. Isolate with TIGI® Colour™ Meche Strips.
Step 9. Working in the top section, apply Colour Selection 2 to the first two slices and isolate with TIGI® Colour™ Meche Strips.
Step 10. For the remaining slices, apply colour selections in the following pattern: Colour Selection 3, Leave Natural, Colour Selection 2, Leave Natural. Isolate with TIGI® Colour™ Meche Strips. -
 3
3
YOU MIGHT LIKE THIS
-
Hair Color
Champagne and Lilac from TIGI copyright©olour
-
Hair Color
TIGI® Colour Lights Technicals
-
Hair Color
TIGI® Colour™ “Classic” Step-by-Step
-
Hair Color
TIGI Intense Reds Colour Technicals
-
Hair Color
TIGI Colour “Glamour” Step-by-Step
TRENDING NOW!
-
BTC Hair Trend Report
The Biggest Haircut Trends of 2024
-
Copper
What Is The "Cowboy Copper" Hair Trend? Here's What It Really Means...
-
Uncategorized
TikTok's Viral "Scandinavian Hairline" Is Actually Not New...
-
Business
3 Reasons Why Today's Highlights Are So Expensive
-
BTC Hair Trend Report
Quiet Luxury Blonde: The "Old Money" Trend Explained
-
Blonde
Toning: 5 Fast Purple Shampoo Ideas For Blondes, Silver & Gray
-
Blonde
3 Purple Toning Tips For Clear, Bright Blondes
-
Bobs
How to Avoid a Bulky Bob: 4 Techniques To Try

