
TIGI Colour “Steels”

Advertisement
TIGI Colour “Steels”
HOW-TO STEPS 
-
 1
1Colour Selection 1
Roots to Ends: TIGI Colour Creative + TIGI Colour Activator 20 vol/6%Colour Selection 2
Roots to Ends: TIGI Colour Creative + TIGI Colour Activator 20 vol/6%Colour Selection 3
Mid-lengths to Ends: TIGI Colour Creative + TIGI Colour Activator 20 vol/6% -
 2
2Colour Selection 1
Roots to Ends: TIGI Colour Creative with
TIGI Colour Activator 20 vol/6%Colour Selection 2
Roots to Ends: TIGI Colour Creative with
TIGI Colour Activator 20 vol/6%Colour Selection 3
Mid-lengths to Ends: TIGI Colour Creative with
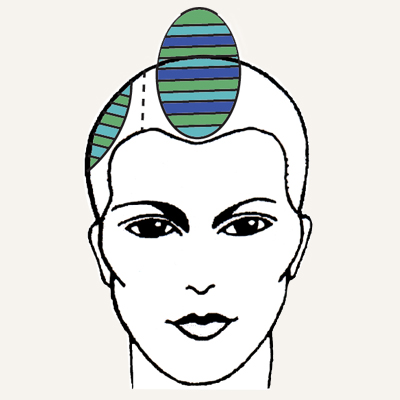
TIGI Colour Activator 20 vol/6%Step 1: Take a large oval parting on one side of the part and isolate.
Step 2: Take another oval section on the opposite side and isolate.
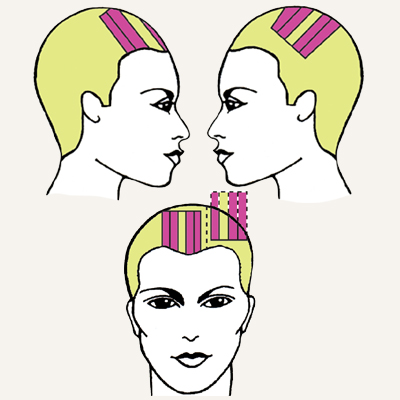
Step 3: Starting in the front hairline, take a horizontal placement weave and apply Colour Selection 1 and isolate with TIGI Colour Meche Strips.
Step 4: Second, take another horizontal placement weave and apply Colour Selection 2 and isolate.
Step 5: Third, continue working with the same weave, apply Colour Selection 3 and isolate.
Step 6: Continue working this pattern until the entire section is complete.
Step 7: For the back oval parting, start with Colour Selection 2 and alternate with Colour Selection 1 until the section is complete. -
 3
3Colour Selection 1
Roots to Ends: TIGI Colour Creative + TIGI Colour Activator 20 vol/6%Colour Selection 2
Roots: TIGI Colour Creative + TIGI Colour Activator 20 vol/6%
Mid-lengths to Ends: TIGI Colour True Light with
TIGI Colour Activator 8.5 vol/2.55% -
 4
4Colour Selection 1
Roots to Ends: TIGI Colour Creative + TIGI Colour Activator 20 vol/6%Colour Selection 2
Roots: TIGI Colour Creative + TIGI Colour Activator 20 vol/6%
Mid-lengths to Ends: TIGI Colour True Light with
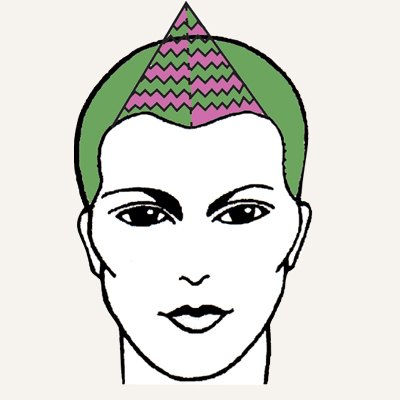
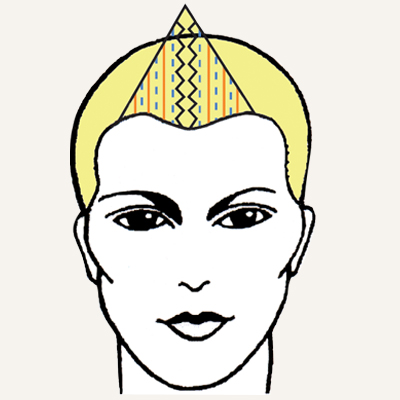
TIGI Colour Activator 8.5 vol/2.55%Step 1: Take a large triangle from mid-recession to the crown.
Step 2: For better control, subdivide the triangle into two sections using a profile parting.
Step 3: Block colour the remaining hair with Colour Selection 1 and isolate with TIGI Colour Meche Strips.
Step 4: Starting in the front hairline on one side of the triangle, take a zig-zag parting and apply Colour Selection 1 and isolate with TIGI Colour Meche Strips.
Step 5: For the second section, take another zig-zag parting and apply Colour Selection 2 and isolate with TIGI Colour Meche Strips.
Step 6: Continue working zig-zag partings alternating between Colour Selection 1 and Colour Selection 2 until the section is complete.
Step 7: For the opposite side, starting at the front hairline, take a zig-zag parting and apply Colour Selection 2 and isolate.
Step 8: For the next section, apply Colour Selection 1 and isolate.
Step 9: Continue working in the same manner alternating the two Colour Selections until the section is complete. -
 5
5Colour Selection 1
Roots to Ends: TIGI Colour Creative
with TIGI Colour Activator 20 vol/6%Colour Selection 2
Roots: TIGI Colour Creative with
TIGI Colour Activator 20 vol/6%
Mid-lengths to Ends: TIGI Colour Creative with
TIGI Colour Activator 20 vol/6% -
 6
6Colour Selection 1
Roots to Ends: TIGI Colour Creative
with TIGI Colour Activator 20 vol/6%Colour Selection 2
Roots: TIGI Colour Creative with
TIGI Colour Activator 20 vol/6%
Mid-lengths to Ends: TIGI Colour Creative with
TIGI Colour Activator 20 vol/6%Step 1: Take a rectangle shape on one side of the part incorporating the fringe area and isolate.
Step 2: Take another rectangle shape on the opposite side of the part near the crown area and isolate.
Step 3: Block colour the remaining with Colour Selection 1 and isolate with TIGI Colour Meche Strips.
Step 4: Working in the front rectangle area, work from the bottom to the top of the shape.
Step 5: For the first two slices, apply Colour Selection 2 and isolate with TIGI Colour Meche Strips.
Step 6: Next, take another slice and apply Colour Selection 1 and isolate with TIGI Colour Meche Strips.
Step 7: Continue with the same Colour Selection pattern
until the entire section is complete.
Step 8: For the opposite rectangle, work in the same manner starting from the bottom to the top of the shape. Alternate with two slices of Colour Selection 2 and one slice of Colour Selection 1. -
 7
7Colour Selection 1
Roots to Ends: TIGI Colour Creative
with TIGI Colour Activator 20 vol/6%Colour Selection 2
Roots to Mid-lengths: TIGI Colour Creative
with TIGI Colour Activator 20 vol/6%Colour Selection 3
Roots: TIGI Colour Creative with
TIGI Colour Activator 20 vol/6%
Mid-lengths to Ends: TIGI Colour True Light with
TIGI Colour Activator 8.5 vol/2.55% -
 8
8Colour Selection 1
Roots to Ends: TIGI Colour Creative
with TIGI Colour Activator 20 vol/6%Colour Selection 2
Roots to Mid-lengths: TIGI Colour Creative
with TIGI Colour Activator 20 vol/6%Colour Selection 3
Roots: TIGI Colour Creative with
TIGI Colour Activator 20 vol/6%
Mid-lengths to Ends: TIGI Colour True Light with
TIGI Colour Activator 8.5 vol/2.55%Step 1: Take a large triangle shape incorporating the fringe.
Step 2: Block colour the remaining hair with Colour Selection 1 and root shade the triangle section.
Step 3: Starting on one side of the triangle, take a horizontal slice and apply Colour Selection 2 and isolate.
Step 4: Next, take a natural weave and apply Colour Selection 3 and isolate.
Step 5: Continue working in the same manner until reaching the middle of the triangle shape.
Step 6: In the middle of the triangle, take a thicker zigzag shape and apply Colour Selection 1.
Step 7: For the opposite side, continue working in the same manner, until the section is complete.
YOU MIGHT LIKE THIS
-
Hair Color
TIGI Intense Reds Colour Technicals
-
Hair Color
Vivid Violet from TIGI®
-
Hair Color
TIGI® Colour™ “Glamour” Step-by-Step
-
Hair Color
TIGI® Colour™ “Classic” Step-by-Step
-
Hair Color
TIGI® Colour™ “Street” Step-by-Step
TRENDING NOW!
-
BTC Hair Trend Report
The Biggest Haircut Trends of 2024
-
Copper
What Is The "Cowboy Copper" Hair Trend? Here's What It Really Means...
-
Blowouts
Bombshell Blowouts: 4 Ways To Create Lift With Longevity
-
Curly
Long Layers: 10 Pro Tips + Common Cutting Mistakes
-
Frizz
Straighten & Smooth 2A, Fine-Medium Density Hair
-
Copper
Muted Bronze
-
Ask A BTC Expert
5 Foil Tips & Tricks From @the.blonde.chronicles
-
Haircuts
SHAG 101: The Dos And Don'ts

