
Progressive Layered Cut from Aveda

Advertisement
Advertisement
Progressive Layered Cut from Aveda
HOW-TO STEPS 
-
 1
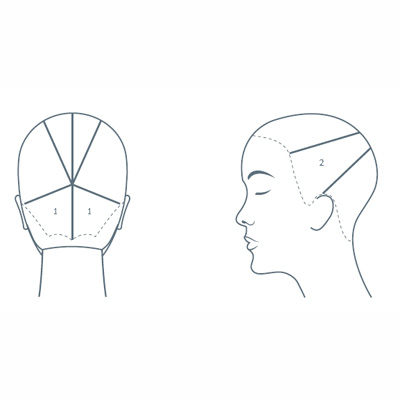
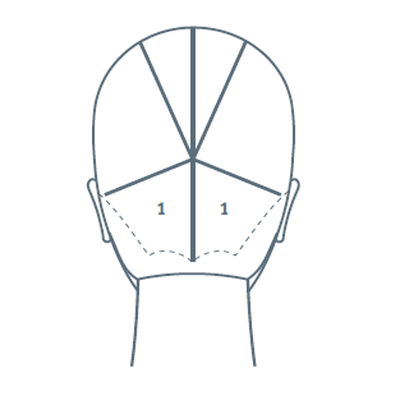
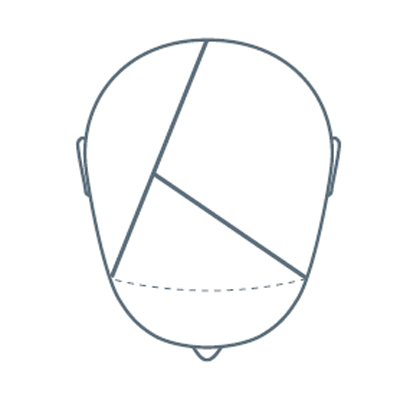
1Panel 1
Section as shown. Take a vertical section in the back panel, lifting straight out from the head. Use a layering technique and elevate higher than 90°. -
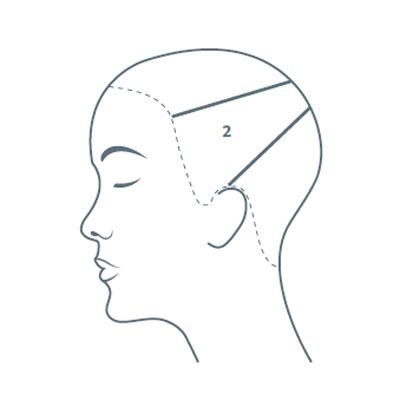
 2
2Take subsequent sections on a diagonal and overdirect them to the previously cut guide (traveling guide). Once you reach the mastoid process, your guide will become stationary. Overdirect all remaining sections back to this point.
-
 3
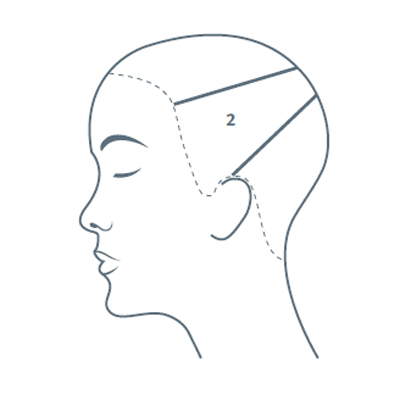
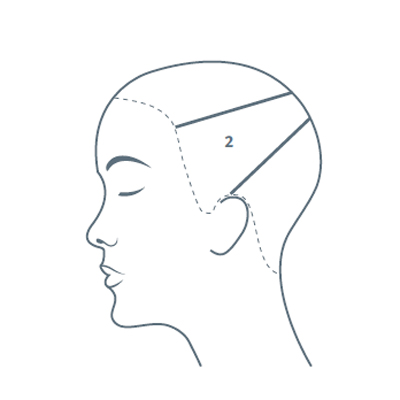
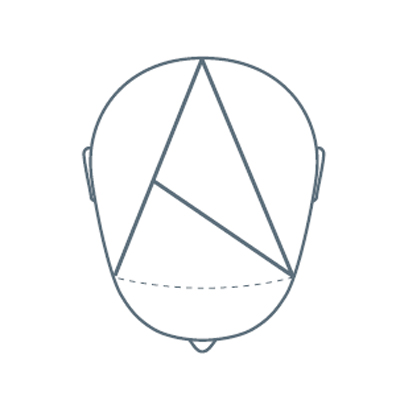
3Panel 2, the sides
Take a vertical section just behind the ear and elevate it straight up to the top of the head (parallel with the floor). Cut from short to long. Note: Create an angle with your fingers that allows the guide to be shorter at the parietal ridge and longer in the perimeter. Use the existing length in the perimeter as a reference when creating this guide. -
 4
4Take subsequent sections through the front on a diagonal and overdirect them back to the first guide over the ear (stationary guide).
-
 5
5Take vertical sections starting just behind the ear and, using the first section as a guide, overdirect these sections forward, allowing the hair to be disconnected from the panel underneath.
-
 6
6Continue in this manner, overdirecting to the previous sections and working toward the center back or until the panel is complete. Repeat on the other side.
-
 7
7The fringe
Take horizontal sections through the fringe and using low elevation, overdirect these sections to the temple and cut a fringe that gets progressively longer. -
 8
8Top panel, wet or dry
Take a vertical section through the center of the top panel and, using the length through the back as a guide, elevate this section straight out from the head at an angle that will allow the hair to be shorter in the crown and longer toward the front. Using the tips of the scissors, cut small amounts of hair while sliding your fingers toward the front of the head, continuing to elevate.
Overdirect subsequent sections to this stationary guide, allowing this section to remain disconnected from the front and sides. Refine the hair cut by pointing and slicing. -
 9
9To style, apply color conserve™ daily color protect and phomollient™ styling foam, rough-dry using fingers and an Aveda wooden paddle brush. Starting at the nape and working upward, set with a large curling iron. Pin each curl into place and allow curls to cool completely. Using a Mason Pearson brush, brush hair and finish with control force™ firm hold.
More Step-by-Steps
Aveda “Indigo” Makeup How-To
The Belted Cut from Aveda
Aveda Prism Collection “Liz”
YOU MIGHT LIKE THIS
-
Hair
Imperfect Waves from Aveda
-
Hair Color
Estetica Presents: Chromatic Suggestions by Aveda
-
Hair
Aveda Prism Collection “Liz” Step-by-Step
-
Hair
Roughed Up Braid from Aveda
-
Curly
Timbered Waves from Aveda
TRENDING NOW!
-
BTC Hair Trend Report
The Biggest Haircut Trends of 2024
-
Monthly Product Launch List
11 New Game-Changing Hair Launches To Add To Your Arsenal
-
Copper
What Is The "Cowboy Copper" Hair Trend? Here's What It Really Means...
-
Frizz
Straighten & Smooth 2A, Fine-Medium Density Hair
-
Copper
Muted Bronze
-
Blonde
Conditioner Before Toner: Common Hair Myth Debunked
-
BTC Hair Trend Report
WWYD: How Hairstylists Are Navigating Inflation
-
Haircuts
SHAG 101: The Dos And Don'ts

